 Save
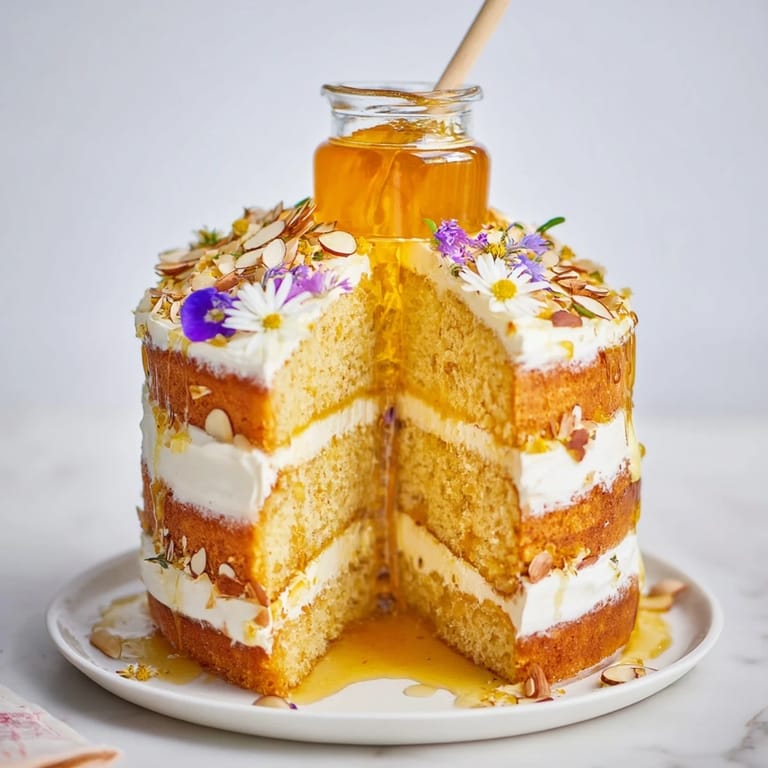
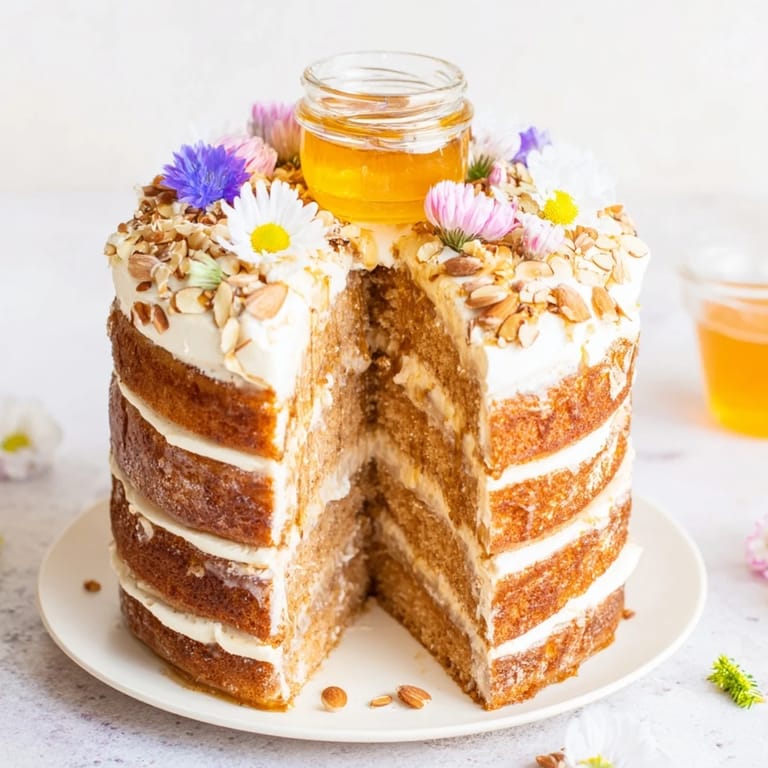
Save The first time I served this to friends, I watched their faces the moment they realized the honey wasn't just an ingredient—it was the entire point. One guest dipped a forkful into that golden center and something shifted in the room, like we'd stumbled onto something more theatrical than dessert. I'd been inspired by a chance conversation with a pastry chef who mentioned that the best honey desserts let you taste the honey as itself, not hidden away in the crumb. This cake became my answer to that challenge.
I made this for my sister's book club, and someone asked if they could take a photo before eating it. That never happens at our house. What stuck with me wasn't the Instagram moment though—it was watching everyone slow down, actually tasting each layer, comparing notes on the honey's floral notes. One person asked if I'd used wildflower honey, and honestly, I hadn't even considered it mattered until that question.
Ingredients
- All-purpose flour (2 cups): The base of everything—make sure it's fresh and aerated by whisking or sifting before measuring.
- Baking powder and baking soda (1½ tsp and ½ tsp): These work together to give you a tender crumb that won't be dense or heavy despite all that honey.
- Salt (¼ tsp): This tiny amount amplifies the honey's sweetness rather than making it salty, which is the whole trick.
- Unsalted butter (½ cup, softened): Softened means it should feel like clay—if it's too cold, your batter won't cream properly.
- Granulated sugar (½ cup): This creams with the butter to trap air, which gives you lift even though honey is liquid.
- Honey (½ cup for the cake): Use a good-quality variety here since it's going into the crumb itself—the flavor will read as that honey's character.
- Large eggs (3): Room temperature eggs blend in more smoothly and create a silkier cake.
- Vanilla extract (1 tsp): This shouldn't overpower; it's just a whisper that makes the honey taste more like itself.
- Whole milk (¾ cup): The slight fat content keeps the crumb from drying out, which is crucial since you're baking at a moderate temperature.
- Heavy cream (1 cup): For whipping—you need real cream here, not the ultra-processed kind.
- Mascarpone cheese (¼ cup): This is what makes the filling taste expensive; it adds a subtle tang and richness that plain cream can't achieve alone.
- Liquid honey for serving (1 cup): Wildflower or acacia if you can find it—this is what guests will taste directly, so quality matters.
- Toasted almonds (¼ cup, chopped): The toasting is non-negotiable; raw almonds taste like nothing, but toasted ones add a gentle crunch and warmth.
Tired of Takeout? 🥡
Get 10 meals you can make faster than delivery arrives. Seriously.
One email. No spam. Unsubscribe anytime.
Instructions
- Set up your baking stage:
- Preheat your oven to 350°F and grease two 8-inch round pans thoroughly, then line the bottoms with parchment. This is your insurance against sticking, which matters when you're cutting these layers so thin.
- Build your dry mix:
- Whisk together flour, baking powder, baking soda, and salt in one bowl—this distributes the leavening evenly throughout and breaks up any lumps.
- Cream the butter and sugar:
- Beat them together for about 2 minutes until it looks pale and fluffy, almost like frosting. You're aerating the butter, which is what gives this cake its tender structure.
- Fold in the honey and eggs:
- Add the honey in one pour, then add eggs one at a time, beating after each one. The honey will seem to separate at first—this is normal and it comes together as you mix.
- Alternate wet and dry, gently:
- Start and end with the flour mixture, adding in three additions of dry and two of milk. Stir just until combined—overmixing at this stage toughens the cake.
- Bake with patience:
- Divide batter evenly between pans and bake for 22–25 minutes until a toothpick comes out clean or with just a few crumbs clinging to it. Let cool completely in the pans before turning out.
- Make the honey cream:
- Whip cold heavy cream to soft peaks, then add honey and mascarpone and whip to stiff peaks. Chill this while your cakes cool—you want it cold so it holds its shape between layers.
- Slice and layer:
- Slice each cooled cake horizontally to create four thin layers total. Place the first layer on your serving platter and spread with a generous spoonful of honey cream, then repeat with the remaining layers.
- Cut and position the honey center:
- Using a 3-inch round cutter, carefully cut a hole from the center of the entire stacked cake. Place a small glass or ceramic honey pot into the hole and fill it right before serving so the honey stays warm and pourable.
- Finish and present:
- Scatter toasted almonds and edible flowers across the top, then add a final honey drizzle. This is when it becomes a centerpiece.
 Save
Save The real magic happened when my nephew, who doesn't usually care about desserts, took one bite dipped in that honey and asked for seconds before he'd even finished his first slice. That's when I knew this wasn't just a pretty cake—it was memorable because it changed what honey could be for people who thought they already knew what honey tasted like.
Choosing Your Honey
Not all honey is created equal, and this is the one recipe where your choice actually matters. Wildflower honey brings a complex floral sweetness that feels sophisticated without being cloying, while acacia honey is more delicate and clear-tasting. I once made this with regular supermarket honey and it was fine, but fine isn't why you'd make something this intentional. The honey you serve in the center pot will be tasted straight, so treat it like you'd treat choosing wine.
The Layering Moment
Slicing those cooled cakes into thin layers requires confidence and a serrated knife, but it's simpler than you might think. I used to overthink it, rotating the cake and measuring with my fingers, which only made me more nervous. Now I just mark the halfway point on the side of the cake with a toothpick, use that as my guide, and cut in one smooth motion. The first time you pull apart those four layers and see them all stack up is weirdly satisfying.
Making It Your Own
This recipe is a frame, not a rule. I've made it with orange blossom honey that turned it floral and fanciful, and another time with chestnut honey which was earthy and different. A friend made it nut-free for her daughter and topped it with candied citrus peel instead, and it was equally striking. The core of the cake stays the same, but the honey gets to be the voice.
- Try adding a tablespoon of lemon zest to the batter for brightness that makes the honey feel less heavy.
- If you're serving it at a dinner party, bake the cakes the day before and assemble just a few hours before guests arrive.
- The central honey pot can be filled in advance if you're using a ceramic vessel that holds temperature—it stays warm longer than glass.
 Save
Save This cake works because it respects honey as the main character, not a supporting ingredient. Serve it with Moscato or a dessert wine, and watch what happens when people realize they can taste every layer and every choice you made. That's the whole point.
Recipe Help & Answers
- → What type of honey works best for this cake?
Wildflower or acacia honey is recommended for its aromatic and floral qualities, enhancing the cake’s natural sweetness.
- → Can I use a different nut for the garnish?
Yes, toasted almonds add crunch, but you can substitute with toasted pecans or walnuts if preferred or omitted for nut-free options.
- → How should I serve the honey in the central pot?
Serve the honey warm in the small pot placed in the cake’s center to allow guests to dip each bite for extra flavor.
- → Can this cake be prepared in advance?
Absolutely. The cake layers and honey cream can be made ahead and assembled before serving to let flavors meld.
- → Are there any suggested drink pairings?
A glass of Moscato or late-harvest Riesling pairs beautifully, complementing the honey’s sweetness with light fruitiness.